almost burned down the car
- Nanonevol
- Patron 2018

- Posts: 828
- Joined: Thu Nov 13, 2014 9:17 am
- Your car is a: 1977 Fiat 124 Spider
- Location: Medway, Massachusetts
almost burned down the car
Running fine, looking to clean up and improve the electricals. Notice a stud on the back of the alternator with three wires attached and the ring connectors look like they could be cleaned up. Disconnect the battery. Take the bolt off the stud with a 10mm and the the three wires and a few washers. Clean up the ring connectors with the dremel and put it back together with some new washers, star washers, nut, so its a nice tight connection. Figured it was a ground. Next day, connect the battery to go for a spin. Big spark at the battery so I take it off. Smoke is coming out from under the hood. Look at my new clean connection and one of the wires is melted. It's green and goes to the starter (hadn't looked earlier) Disconnect it all again and find of course the melted wire is 12 volt and of course the stud is ground. Looking at the washers I took off, one of them is of a brown material and is an insulator. Is this the way 12 volts from the starter should connect to the other two wires? By bolting them together on a grounded stud on the alternator? I don't know much electrical (obviously) but will now go look at the wiring diagrams.
1977 Fiat Spider
1985 Jaguar XJ6
1967 Triumph Bonneville (hard-tail chopper)
1966 BSA Lightning
1985 Jaguar XJ6
1967 Triumph Bonneville (hard-tail chopper)
1966 BSA Lightning
-
So Cal Mark
Re: almost burned down the car
the stud on the alternator is 12v, not a ground!!!!!!!!!!!
-
vandor
- Posts: 3996
- Joined: Sat May 23, 2009 1:23 pm
- Your car is a: 1971 124 Spider
- Location: Texas, USA
Re: almost burned down the car
Some alternators have a stud coming out of the body, and of course those are grounded. So the wires may have been put back on a grounded stud instead of the output stud of the alternator?
Csaba
'71 124 Spider, much modified
'17 124 Abarth, silver
http://italiancarclub.com/csaba/
Co-owner of the best dang Fiat parts place in town
'71 124 Spider, much modified
'17 124 Abarth, silver
http://italiancarclub.com/csaba/
Co-owner of the best dang Fiat parts place in town
-
spider2081
- Patron 2024

- Posts: 3015
- Joined: Fri Jan 27, 2006 11:45 pm
- Your car is a: 1981 Spider 2000
- Location: Wallingford,CT
Re: almost burned down the car
Here are a couple photos of the alternator output stud. It has the letters "B+" close to it. There is an insulator between the stud and the alternator case that is not shown in the photo. The washer closest to the alternator case is a fiber insulating washer, next is a metal flat washer and last before the nut is a split lock washer. The output stud must be insulated from the the alternators case. It is easy for one of the wires terminal lugs to short to the case when assembling.


- Nanonevol
- Patron 2018

- Posts: 828
- Joined: Thu Nov 13, 2014 9:17 am
- Your car is a: 1977 Fiat 124 Spider
- Location: Medway, Massachusetts
Re: almost burned down the car
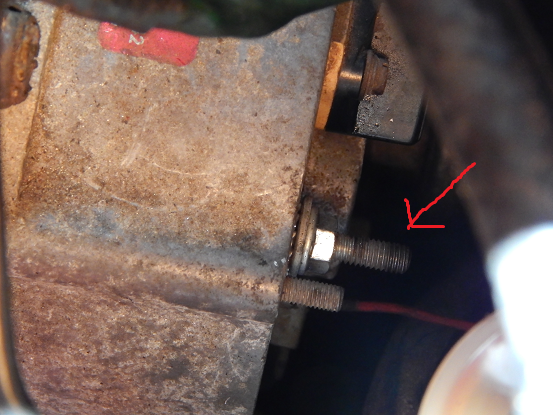
Thank you X 3. So that insulating washer is critical! Seems odd to me. The case of course is grounded but also the threads on this stud, right? Why don' t the ring connectors on the 12v wires short to the threads of the stud?
(photo of my stud needing correct reassembly)

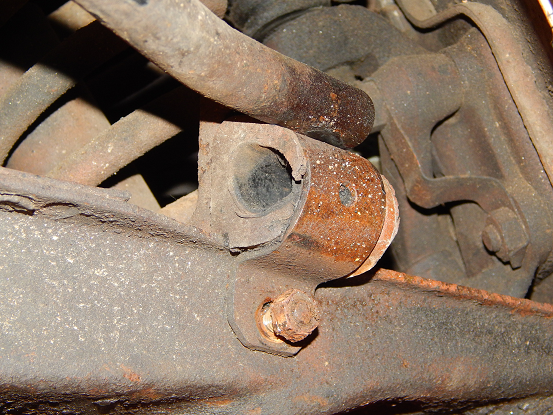
Jacked up the car and noticed another issue.

Looks like my sway bar is just resting on the end support!
(photo of my stud needing correct reassembly)

Jacked up the car and noticed another issue.

Looks like my sway bar is just resting on the end support!
Last edited by Nanonevol on Wed Sep 20, 2017 2:11 pm, edited 1 time in total.
1977 Fiat Spider
1985 Jaguar XJ6
1967 Triumph Bonneville (hard-tail chopper)
1966 BSA Lightning
1985 Jaguar XJ6
1967 Triumph Bonneville (hard-tail chopper)
1966 BSA Lightning
-
DieselSpider
- Posts: 2130
- Joined: Wed Dec 24, 2014 10:21 pm
- Your car is a: 1978 124 Spider with Isuzu Turbo Diesel
Re: almost burned down the car
You may have accidentally swapped the insulated washer with a metal star washer grounding the alternator output lug to the alternator case. The output lug should come through an insulated sleeve to prevent the sides from grounding out to the alternator case and then you need to be careful to not allow the ends of the electrical wires to contact the grounded mounting stud nearby on the alternator case.
Especially when doing something that you have not done for a while you need to take before and after pictures all along the way so you can then refer to them to double and triple check yourself as you put it all back together.
If the fiber washer was lost or disintegrated the local Ace, Home Depot or Lowes should have them in the drawers in the Hardware Isle.
Hopefully the alternator did not charge its fields and blow the diodes and you will just have to put in a new fiber washer and clean up a few wires. Verify with an inexpensive volt/ohm meter that the stud is not shorted internally before you do anything else with the alternator.
-
spider2081
- Patron 2024

- Posts: 3015
- Joined: Fri Jan 27, 2006 11:45 pm
- Your car is a: 1981 Spider 2000
- Location: Wallingford,CT
Re: almost burned down the car
WOW you photo looks like you have a star washer as the first washer on the output stud. For sure if that is the case you did not install the washers as you removed them. The output stud needs to be 100% insulated from the alternator case, car's chassis and battery ground. The sleeve that insulates the stud is a shoulder sleeve and can not be removed with our disassembling the alternator so unless it is broken it should be in place. The next part to be installed on the stud is a flat insulating washer either fiber or nylon type material. Then a flat metal washer to protect the insulation washer. Then a lock washer and nut. This keeps the stud tight in the alternator case. After these are in place the stud should be long enough to add your wire terminals another flat washer and nut to secure the wire terminals. There should be 2 nuts on the stud, one holds the stud and insulators to the alternator case, the other holds the wires to the stud. The wire terminals are between the nuts.
- Nanonevol
- Patron 2018

- Posts: 828
- Joined: Thu Nov 13, 2014 9:17 am
- Your car is a: 1977 Fiat 124 Spider
- Location: Medway, Massachusetts
Re: almost burned down the car
Yeah, that's a star washer...I was trying for an excellent connection! (which I got!). I have a spare alternator that is supposed to be good and I can use to see again how the washers and insulators are supposed to go.
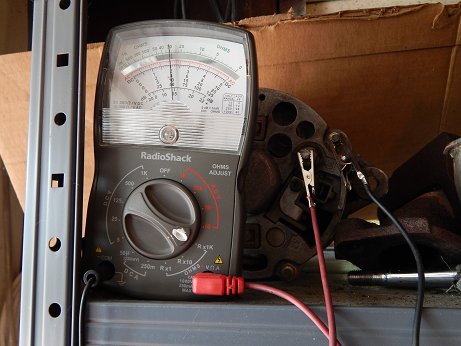
Disclaimer - I know enough electronics to be dangerous, but you know that already. I thought the stud was a ground because my meter showed this: black lead is on the case and red lead on the stud in question.

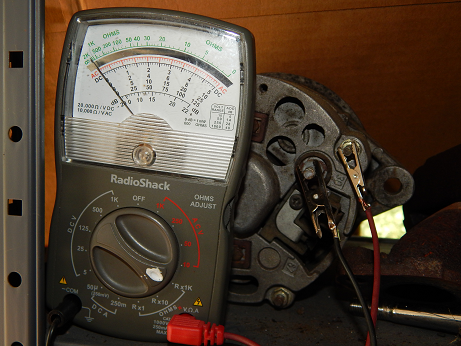
However, now I notice this:

When I switch the leads, it looks like there is no connection.
So I need a lesson in electronics because I don't know why this is. Same situation on the alternator in the car.
Disclaimer - I know enough electronics to be dangerous, but you know that already. I thought the stud was a ground because my meter showed this: black lead is on the case and red lead on the stud in question.

However, now I notice this:

When I switch the leads, it looks like there is no connection.
So I need a lesson in electronics because I don't know why this is. Same situation on the alternator in the car.
Last edited by Nanonevol on Wed Sep 20, 2017 2:12 pm, edited 1 time in total.
1977 Fiat Spider
1985 Jaguar XJ6
1967 Triumph Bonneville (hard-tail chopper)
1966 BSA Lightning
1985 Jaguar XJ6
1967 Triumph Bonneville (hard-tail chopper)
1966 BSA Lightning
-
spider2081
- Patron 2024

- Posts: 3015
- Joined: Fri Jan 27, 2006 11:45 pm
- Your car is a: 1981 Spider 2000
- Location: Wallingford,CT
Re: almost burned down the car
The ohm meter test you are making is checking the diodes in the alternator. An analog meter like the one you have has internal batteries that are used to measure resistance. Their voltage is present on the meters leads. You might have a AA battery in the meter so there is 1.5 volts present on your meter leads when you are measuring resistance. A diode needs 0.7 volts to forward bias the diode or turn it on. The low resistance reading is the diode turned on. The high resistance reading is the diode reversed biased and turned off. The test you are making can show a shorted diode but is unlikely to show an open diode because there is a total of 6 diodes in an alternator. Hope this helps
- Nanonevol
- Patron 2018

- Posts: 828
- Joined: Thu Nov 13, 2014 9:17 am
- Your car is a: 1977 Fiat 124 Spider
- Location: Medway, Massachusetts
Re: almost burned down the car
A bit. To be honest most of that was Greek to me and I don't speak Greek. The good news is I made a new 10 gauge wire for starter to alternator, put things back together correctly and she runs and she charges. Thank you all for the help and advice 
1977 Fiat Spider
1985 Jaguar XJ6
1967 Triumph Bonneville (hard-tail chopper)
1966 BSA Lightning
1985 Jaguar XJ6
1967 Triumph Bonneville (hard-tail chopper)
1966 BSA Lightning
-
76was124
- Patron 2019

- Posts: 620
- Joined: Sun May 16, 2010 4:43 pm
- Your car is a: 1981 Spider 2000
- Location: Detroit Area
Re: almost burned down the car
Picture a diode as a check valve...it passes + voltage one way only, your meter applies + voltage for the resistance test.
Current 81 Spider 2000
Previous 76 Spider
Previous 76 Spider
-
DieselSpider
- Posts: 2130
- Joined: Wed Dec 24, 2014 10:21 pm
- Your car is a: 1978 124 Spider with Isuzu Turbo Diesel
Re: almost burned down the car
The meter would have to be just about pegged for it to be a ground. That is just showing that the fields in the alternator are not broken and that the diodes are working as they should passing current in only one direction.
If you want to be 100% certain most auto parts stores will test alternators and starter for free since it is really bad for business to sell you a starter or alternator and then you still have a problem or think that they sold you a bad one.
If you want to be 100% certain most auto parts stores will test alternators and starter for free since it is really bad for business to sell you a starter or alternator and then you still have a problem or think that they sold you a bad one.
- Nanonevol
- Patron 2018

- Posts: 828
- Joined: Thu Nov 13, 2014 9:17 am
- Your car is a: 1977 Fiat 124 Spider
- Location: Medway, Massachusetts
Re: almost burned down the car
This has been very educational. Alternator 101. By the way, the "brown wire fix" may be simple but it's not so easy. The starter stud is in a tight spot. I could get my hand to it but not really when holding onto a nut.
1977 Fiat Spider
1985 Jaguar XJ6
1967 Triumph Bonneville (hard-tail chopper)
1966 BSA Lightning
1985 Jaguar XJ6
1967 Triumph Bonneville (hard-tail chopper)
1966 BSA Lightning
-
DieselSpider
- Posts: 2130
- Joined: Wed Dec 24, 2014 10:21 pm
- Your car is a: 1978 124 Spider with Isuzu Turbo Diesel
Re: almost burned down the car
I get a bit insulated from those issues since on the Isuzu Diesel in mine, which is Single Overhead Cam, the starter is right out in the open and its about a 15 minute job to replace it.Nanonevol wrote:This has been very educational. Alternator 101. By the way, the "brown wire fix" may be simple but it's not so easy. The starter stud is in a tight spot. I could get my hand to it but not really when holding onto a nut.
To run the glow plugs a Ford style barrel starter relay was installed on the fire wall and has the same gauge wire as the main battery cable going to it which makes for a more convenient point to tap into the main feed for adding fused relays and the Brown Wire fix.
The tight spaces on the Diesel are the water pump shaft is about 1/2 inch from the radiator and the turbo charger makes it hard to get to the fill port on the steering box. The steering center link is also a bit uncomfortably close to the bell housing and rubs with a bit of a creak during hard turns.