After 5 years of use (with and occasional too-hard yank into reverse), the boot I installed in 13 has given up staying inside the retaining ring, and has torn in a couple of places. Just ordered new boot and ring from one of the vendors. I recall a real struggle 4 years ago, and wondered if anyone has description/pix of the process. I get which direction the retaining ring fits, but wondered 1) how do folks keep everything lined up and together, and 2) what's generally used to fasten the ends of the ring together? I used a small pop rivet last time (had to drill out a hole), but figure that's NOT the way to do it.....
Any suggestions welcome. Final show (food pantry benefit) coming up in 10 days, want the 72 looking sharp....
Neil
Shifter boot replacement process
-
njoconnor
- Posts: 614
- Joined: Thu Jul 05, 2012 7:06 pm
- Your car is a: 1972 124 Spider
Shifter boot replacement process
Neil O'Connor
Madison, WI
72 FIAT 124 Spider
12 Jeep Grand Cherokee Overland Summit
14 Ram 1500 Laramie Longhorn Eco-Diesel
ex-71 FIAT 124 Coupe
and a host of Audi's, Saabs, VW's, MOPAR's, Fords, and a Bimmer....
Madison, WI
72 FIAT 124 Spider
12 Jeep Grand Cherokee Overland Summit
14 Ram 1500 Laramie Longhorn Eco-Diesel
ex-71 FIAT 124 Coupe
and a host of Audi's, Saabs, VW's, MOPAR's, Fords, and a Bimmer....
-
ORFORD2004
- Posts: 1126
- Joined: Wed Mar 17, 2010 9:48 pm
- Your car is a: 1983 PININFARINA
- Location: Sherbrooke, Qc, Canada
Re: Shifter boot replacement process
When I replace mine, there was a metal screw that hold both parts together. I used contact glue to hold the boot around the ring.
-
PhillySpider
- Posts: 325
- Joined: Tue Apr 26, 2016 6:51 pm
- Your car is a: 1980 Spider 2000
- Location: New Hope, PA
Re: Shifter boot replacement process
No pics, but i recall sore fingers and lots of f bombs  ...
...
- RRoller123
- Patron 2020

- Posts: 8179
- Joined: Sun Nov 13, 2011 2:04 pm
- Your car is a: 1980 FI SPIDER 2000
- Location: SAGAMORE BEACH, MA USA
Re: Shifter boot replacement process
The ring on mine had some sort of rivet that allowed it to swivel and close in upon itself, allowing the boot to be installed, the ring fitted back into the plate.
'80 FI Spider 2000
'74 and '79 X1/9 (past)
'75 BMW R75/6
2011 Chevy Malibu (daily driver)
2010 Chevy Silverado 2500HD Ext Cab 4WD/STD BED
2002 Edgewater 175CC 80HP 4-Stroke Yamaha
2003 Jaguar XK8
2003 Jaguar XKR
2021 Jayco 22RB
2019 Bianchi Torino Bicycle
'74 and '79 X1/9 (past)
'75 BMW R75/6
2011 Chevy Malibu (daily driver)
2010 Chevy Silverado 2500HD Ext Cab 4WD/STD BED
2002 Edgewater 175CC 80HP 4-Stroke Yamaha
2003 Jaguar XK8
2003 Jaguar XKR
2021 Jayco 22RB
2019 Bianchi Torino Bicycle
-
njoconnor
- Posts: 614
- Joined: Thu Jul 05, 2012 7:06 pm
- Your car is a: 1972 124 Spider
Re: Shifter boot replacement process
Thanks, guys! Hadn't thought of contact glue. The last ring I used had no screw or sliding rivet; we'll see what the new one has (different vendor this time).
Last install, I positioned the "longer" side to the front; that the correct orientation?
Neil
Last install, I positioned the "longer" side to the front; that the correct orientation?
Neil
Neil O'Connor
Madison, WI
72 FIAT 124 Spider
12 Jeep Grand Cherokee Overland Summit
14 Ram 1500 Laramie Longhorn Eco-Diesel
ex-71 FIAT 124 Coupe
and a host of Audi's, Saabs, VW's, MOPAR's, Fords, and a Bimmer....
Madison, WI
72 FIAT 124 Spider
12 Jeep Grand Cherokee Overland Summit
14 Ram 1500 Laramie Longhorn Eco-Diesel
ex-71 FIAT 124 Coupe
and a host of Audi's, Saabs, VW's, MOPAR's, Fords, and a Bimmer....
-
profcucchi
- Posts: 248
- Joined: Sun Oct 23, 2011 2:12 pm
- Your car is a: 1979 Fiat 2000
- Location: Toronto, On
Re: Shifter boot replacement process
My retainer ring was broken when I got it, and I keep forgetting to replace it because... I have a few small binder clips (removed the arms) holding it in place and it works perfectly.
1979 Fiat 2000 "Luigi"
-
njoconnor
- Posts: 614
- Joined: Thu Jul 05, 2012 7:06 pm
- Your car is a: 1972 124 Spider
Re: Shifter boot replacement process
Binder clips....yeah.
Yesterday was too beautiful to stay home, so I used duct tape to keep the hem under the shifter panel. Held up well for the 70 mile run around western Dane county's back twisties. FEDEX sez new boot and ring due end of day Saturday, too late for the car show, so tape/binder rings just might get me through!
Neil
Neil O'Connor
Madison, WI
72 FIAT 124 Spider
12 Jeep Grand Cherokee Overland Summit
14 Ram 1500 Laramie Longhorn Eco-Diesel
ex-71 FIAT 124 Coupe
and a host of Audi's, Saabs, VW's, MOPAR's, Fords, and a Bimmer....
Madison, WI
72 FIAT 124 Spider
12 Jeep Grand Cherokee Overland Summit
14 Ram 1500 Laramie Longhorn Eco-Diesel
ex-71 FIAT 124 Coupe
and a host of Audi's, Saabs, VW's, MOPAR's, Fords, and a Bimmer....
-
njoconnor
- Posts: 614
- Joined: Thu Jul 05, 2012 7:06 pm
- Your car is a: 1972 124 Spider
Re: Shifter boot replacement process: solved
Got caught up on some other chores today, and the postal carrier surprised me with the new shifter boot and retaining ring today, 3 days early! So, back into the garage after dinner to see what I could do.
This time, managed to get the whole process done in a little under 20 minutes (including the wrassle of getting the console plate out...and back into...the car!). Figured I'd post my process, in case it helps or inspires someone else (to come up with a better one!).
1) First, try and buy a retaining ring which has serrations in the outer sides of the retaining ring. I had a solid one last time, and it was far easier (and faster) to get the retaining ring shaped exactly to the boot opening prior to installing the boot. The serrations allow the ring to conform very closely to the shifter plate opening, with little to no gapping. The solid ring will work, but requires more time and effort.
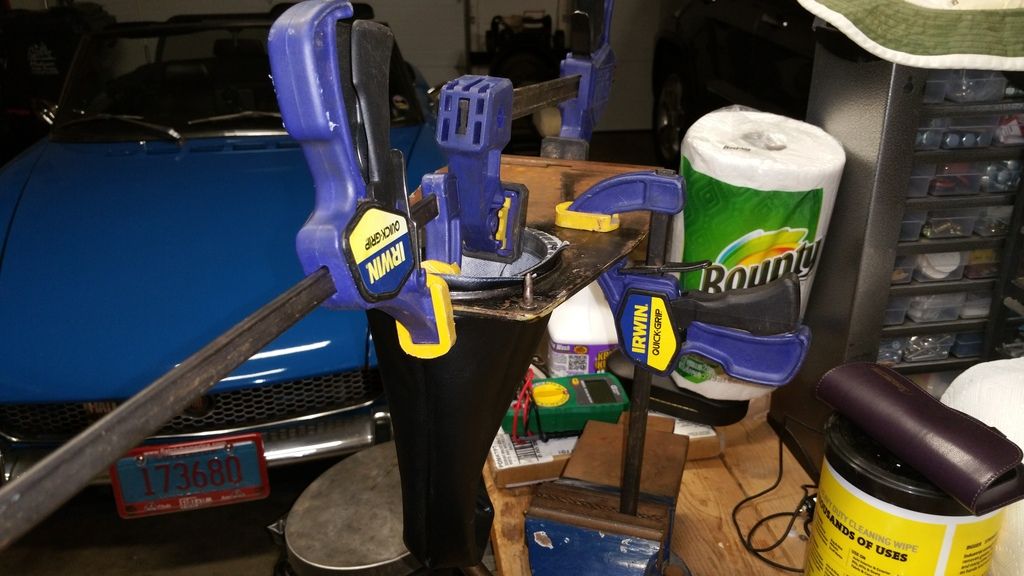
2) Next, I clamped the arm of a quick clamp into a regular bench vise, then clamped the shifter plate upside down in the clamp itself; this clamp can be seen on the right side of the picture:

This holds the plate firmly, and frees up both hands for the next steps.
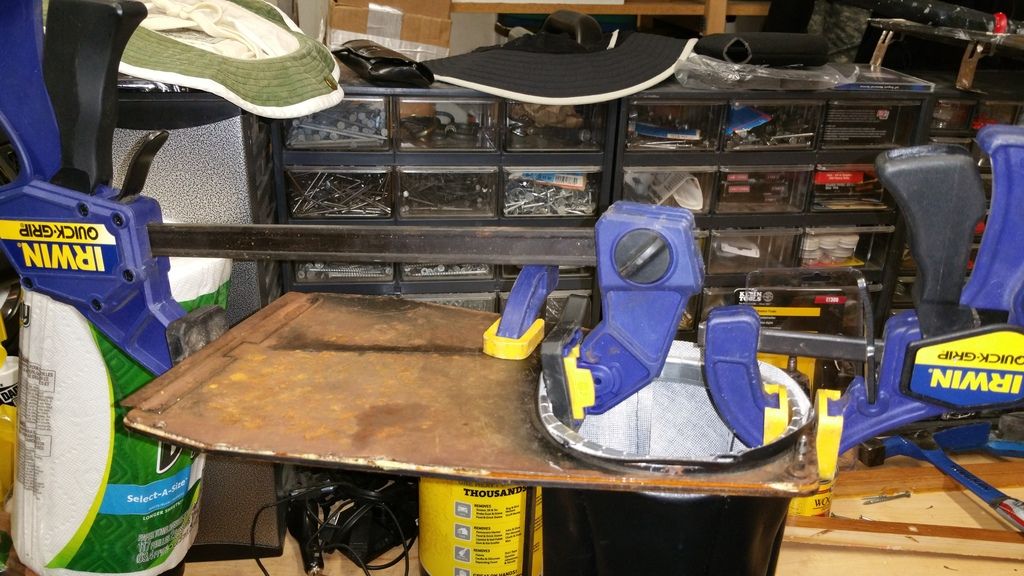
3) With the plate clamped in place, I carefully fitted the retaining ring around the entire opening, pressing the ring into ther curve. The ends of the ring have 2 small round screw/rivet holes on one end, and a slot on the other. I made sure the slot was inside the other end when I finished fitting the ring. The ring is then removed, placed inside the boot, and the whole thing lowered into the shifter plate opening.
4) the next step is what really sped up the process for me:

Using a second quick clamp, I pressed the boot and ring (at the 6 oclock position) on top the shifter plate, and kept it clamped in that position. This force fit the ring, and boot hem, onto the plate. I used a third quick clamp to then work my way around the inside of the opening, pressing the ring/boot onto the plate every inch or so. When the plate became too wide for the smaller clamps, I got out the bigger one, until I worked my way around to the 12 oclock position. This large clamp stayed in place until I fastened the ends of the ring with a #6 x 3/8 in round head screw. Once fastened, released the clamps, and the boot was installed!

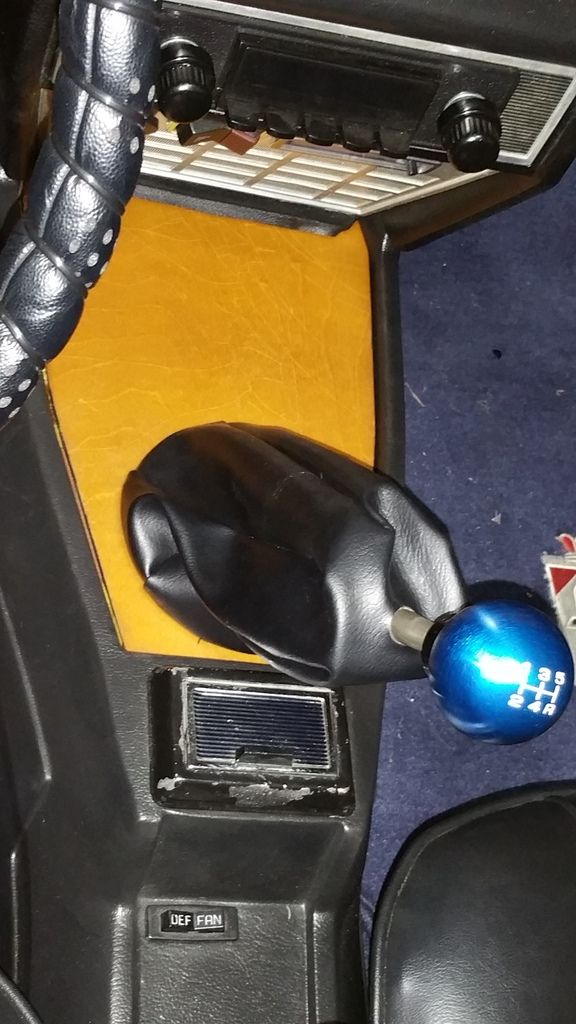
Yeah. I gotta touch up that ash tray.....
So, back together in time for the car show on Saturday. Happy to answer any queries, pm or forum.
Neil
This time, managed to get the whole process done in a little under 20 minutes (including the wrassle of getting the console plate out...and back into...the car!). Figured I'd post my process, in case it helps or inspires someone else (to come up with a better one!).
1) First, try and buy a retaining ring which has serrations in the outer sides of the retaining ring. I had a solid one last time, and it was far easier (and faster) to get the retaining ring shaped exactly to the boot opening prior to installing the boot. The serrations allow the ring to conform very closely to the shifter plate opening, with little to no gapping. The solid ring will work, but requires more time and effort.
2) Next, I clamped the arm of a quick clamp into a regular bench vise, then clamped the shifter plate upside down in the clamp itself; this clamp can be seen on the right side of the picture:

This holds the plate firmly, and frees up both hands for the next steps.
3) With the plate clamped in place, I carefully fitted the retaining ring around the entire opening, pressing the ring into ther curve. The ends of the ring have 2 small round screw/rivet holes on one end, and a slot on the other. I made sure the slot was inside the other end when I finished fitting the ring. The ring is then removed, placed inside the boot, and the whole thing lowered into the shifter plate opening.
4) the next step is what really sped up the process for me:

Using a second quick clamp, I pressed the boot and ring (at the 6 oclock position) on top the shifter plate, and kept it clamped in that position. This force fit the ring, and boot hem, onto the plate. I used a third quick clamp to then work my way around the inside of the opening, pressing the ring/boot onto the plate every inch or so. When the plate became too wide for the smaller clamps, I got out the bigger one, until I worked my way around to the 12 oclock position. This large clamp stayed in place until I fastened the ends of the ring with a #6 x 3/8 in round head screw. Once fastened, released the clamps, and the boot was installed!

Yeah. I gotta touch up that ash tray.....
So, back together in time for the car show on Saturday. Happy to answer any queries, pm or forum.
Neil
Neil O'Connor
Madison, WI
72 FIAT 124 Spider
12 Jeep Grand Cherokee Overland Summit
14 Ram 1500 Laramie Longhorn Eco-Diesel
ex-71 FIAT 124 Coupe
and a host of Audi's, Saabs, VW's, MOPAR's, Fords, and a Bimmer....
Madison, WI
72 FIAT 124 Spider
12 Jeep Grand Cherokee Overland Summit
14 Ram 1500 Laramie Longhorn Eco-Diesel
ex-71 FIAT 124 Coupe
and a host of Audi's, Saabs, VW's, MOPAR's, Fords, and a Bimmer....