Page 2 of 2
Re: 1972 Rolling Restoration
Posted: Thu May 30, 2013 11:32 am
by SLOSpider
Re: 1972 Rolling Restoration
Posted: Thu May 30, 2013 9:33 pm
by kbee00
Thanks SLO - although the dampers are very different - it looks like CCW is full soft. So mine are set at almost full hard - which makes sense based on how they feel.
Great - now they have to come back out..... thanks SLO!!

The dilemma is the fronts....swear they are set the same as the rears - but they behave totally different.....Great - out with the fronts too.....thanks again SLO!!

We'll see if the Vicks trick A-Arms were worth the extra money....
Will update in a week or so - I am traveling for awhile.
kbee00
Re: 1972 Rolling Restoration
Posted: Sun Jun 02, 2013 6:53 pm
by fiat218
kbee00 wrote:Thanks Csaba - that's what I did and you are right -it was very obvious. I got the front end done - but didn't have time for the rears. Drove it today and it feels different already. The back situation is much more pronounced - so it will need changing soon. Running different dampers and springs is not good anyway -but i wanted to get out and put some miles on it so I can go back in and tighten, check, etc. when I do the rears.
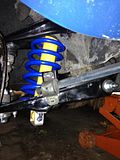
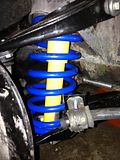
Pics of the completed front:


You will notice the studs that connect the roll bar are shiny - the studs supplied on the Vicks arm broke free - and since they were rivet style studs there was no way to tighten them up - so i replaced with bolts. Also, the bolt on bottom brackets that hold the damper are setup such that you can't remove/install the damper bolt with the bracket bolted in place - they interfere. So I am not seeing the benefit in having the bracket removable - can someone explain this to me? It was supposed to be a design feature that allowed damper adjustment without removing from car.....don't see it.
Like most new endeavors -the first side took me 8 hours and the second side 2 hours.... But I am happy with the new parts and once the rears are done will let you know how it all works out.
Next are wheels.....
Once winter arrives - the interior will change color, as will the top, new wood for the dash, some new paint, and my trick 2L engine.....will be a busy winter. And I can't wait!
Thanks for following along.
kbee00
yellow and blue is not a good combo lol
Re: 1972 Rolling Restoration
Posted: Mon Jun 03, 2013 11:43 pm
by kbee00
Yellow and blue make green - yes?
Green is one of the colors of the Italian Flag - yes?
ergo - yellow and blue do mix together well....
I am changing the interior to white w/white top and white stripe on the blue body.
Now I just need some red.....
AHA! the color of my knuckles every time I work on my car.....so I am good to go!!
Jim - you are an inspiration to us all !!!
Re: 1972 Rolling Restoration
Posted: Tue Jun 04, 2013 6:48 am
by fiat218
kbee00 wrote:Yellow and blue make green - yes?
Green is one of the colors of the Italian Flag - yes?
ergo - yellow and blue do mix together well....
I am changing the interior to white w/white top and white stripe on the blue body.
Now I just need some red.....
AHA! the color of my knuckles every time I work on my car.....so I am good to go!!
Jim - you are an inspiration to us all !!!
Your welcome

I tell it as I see it ,sorry, it just not a great combo
Re: 1972 Rolling Restoration
Posted: Fri Jun 14, 2013 1:50 pm
by kbee00
Update - so I have replaced the outer tie rod ends - the boots were torn so in the trash they go. Well, I learned that PO's sometimes change things and you only learn AFTER you take something apart.
Case in point - I purchased the outer tie rod ends - the inners were solid and the boots were completely intact. I remove the passenger side first - using a tie rod fork and a BIG hammer. As I attempt to thread the new rod end on - it seems the threads on tie rod are RH and the threads on the tie rod end are LH. AHAH! must have the wrong tie rod end. I grab the other one and it is also LH threads. WTF ???? So I go to the drivers side - remove that tie rod end - and it is LH thread - so on goes the new one. easy peasy. So what happened? I learned that the PO must have swapped the tie rod around - why I have no idea. So I have a RH thread on order and had to put the old one back on - which I don't like to do - but the car is my driver. So I am careful and keep my speed down.....
something else I noticed - I set up my jacks and string to align the car - lo and behold the drivers side front tire is pushed out 1/4" more than the passenger side. I mean the whole tire (I was measuring at exact center of the tire). I had to put a 1/4" shim on the outside of the rear tire so the string would match on the both sides. So what would cause one side to be pushed out? As you know, I just replaced the entire front suspension - everything except the crossmember - I didn't remove or add any shims. Any thoughts on this situation? BTW - I set the toe in at 1/8" each side.
Next on the list is to replace the worn steering column bearings and tighten the steering box. I have a new one, but am waiting until winter to replace it. I am then thinking about adding a new stereo - just can't stand the sound of the POS aftermarket unit and lousy speakers. But I want to build a rear storage unit / combo speaker box first so....
Anyway - thanks for following along. And any advice on the alignment issue would be appreciated.

kbee00
Re: 1972 Rolling Restoration
Posted: Fri Jun 14, 2013 6:28 pm
by vandor
That's why we sell tierod ends in pairs

The left tire being farther out could be production tolerances, who knows. I don't know how close it's supposed to be.
I know that on many Spiders the rear tires are not the same horizontal distance from the fender lip.
BTW, I usually use a tape measure to set the toe, and a digital level to set the camber and caster. No strings needed.
Re: 1972 Rolling Restoration
Posted: Sat Jun 15, 2013 7:49 am
by BEEK
I set the toe in at 1/8" each side.
if im reading this correct, that would be 1/4" of total toe? if so thats too much
the rear end in the fiat does move from side to side depending on the ride height. this is a physics issue due to the panhard rod.
Re: 1972 Rolling Restoration
Posted: Sat Jun 15, 2013 11:55 am
by kbee00
Thanks for the correction - total toe is 1/8" - not each side. Holy worn tires Batman!
I thought about the Panhard rod thing too - and then realized I have lowered car thus possibly pushing the axle one way. Mystery solved! Thanks BEEK.
I replaced the points and coil with AR's Pertronix unit and Flamethrower coil. Took me a bit make sure I had the correct wires in the correct place, but once installed it fired right up first try. My only complaint is that the wires did not reach the coil - I had to solder on extension wires. I haven't checked the timing - but the seat of the pants tells me I have a bit more pep in the engine - the points were installed by the PO so no idea how old of if they were set correctly.
I also replaced the front wheel bearings as mine were grumbling a bit. I should've just bought new hubs for all the work it was getting the races out - damn! that took a long time.

Anyone notice re-installing the front brake calipers a real PIA ? I mean it takes 15 minutes just to line up one bolt....
Same thing for the wheel bolts. Anyone replace them with studs?
kbee00
Re: 1972 Rolling Restoration
Posted: Sun Jun 23, 2013 7:58 pm
by jimmycakes401
Yeah. Putting the wheels on can be a pain.
Just followed your suspension thread to here. You're doing great work. A lot of stuff I plan to do at some point. I was looking into suspension and searched and found your thread. I was looking at KYBs because I'm not too picky (although I want a softer ride), but I really enjoyed reading about your springs. Thanks. Good luck with the rest.
Re: 1972 Rolling Restoration
Posted: Sun Jul 14, 2013 5:28 pm
by kbee00
Decided to get started on the stereo system for the car. Although I don't really need it, my wife loves a loud stereo - so it was easy to convince her of the cost to do it right. I did my homework, found some deals, and ended up with what should be a nice sounding retro looking system. The stereo head unit is from Retro Sound - I received it yesterday and it looks great! Will look almost totally stock in the Fiat -even the knobs (the inner "knob" turns but has no function - I like the little details like that)
Today my daughter helped my build the sub box for the trunk - she is putting the carpet on it right now.
I decided to try my hand at fiberglass and built a mold for the rear speakers using an old plastic bucket. I duct taped the entire thing - put a layer of bondo over it, sprayed it with lacquer, then used carnuba wax to buff it to a slippery shine. 3 layers of fiberglass later and it came right off the duct tape. I peeled the bondo out of the mold and I have my first rear speaker "box"!


Will carpet that as well and mount to the rear cover panel. Next is to build a mold for the front speaker boxes. I have an old set of map pockets that I will build onto - I have to do a right and left so I am not as concerned about the mold - just has to be able to be removed once the fiberglass dries.
Anyway - time to get some real work done - taking the car to the store in town for a bit of shopping and then time for dinner. The next few weeks are very busy so won't have time to work on the car.
BTW - I added Ramzi's rectangular chrome intake box - looks really nice! But I had no where to vent the big hose in the back so I bought a small air filter for a lawn tractor and adapted that to the hose - perfect breather!! $7 total.
Thanks for following along.
kbee00

